Friday, July 25, 2008
Fast WhoIs Released
fastWhoIs is excellent at getting domain name information fast and effortlessly. You can load a list of domain names to scan, and save the results automatically to files. You can choose which server the WhoIs details comes from, or choose to query multiple servers for complete information. Whether you're looking at purchasing multiple domains, or searching for industry contacts, there's no faster way.
The software is available on trial download and can be purchased for $19.50. Feel free to download and give it a test run.
Thursday, July 17, 2008
Meet us at the Software Industry Conference
Starting today you can find our own Roger Thomasson at the Software Industry Conference in Boston. Unfortunately I couldn't make it this year, but if I promised to buy you a drink I'm sure Roger will oblige for me!
You can spot Roger as he's the one in the blue Bits Du Jour T-Shirt.

You can spot Roger as he's the one in the blue Bits Du Jour T-Shirt.

Sunday, July 6, 2008
Are Google and Yahoo Hurting your Download Site?
Google Suggest!
ASP and other groups have no 'lobbiest' power! Digital River, e-commerce providers?
Thanks. For the fix and the comment. Feel free to blog about this SiteAdvisor thing. I'm trying to kick up a stink. As it stands at the moment, any software developer whose product happens to confuse McAfee's scanner into thinking it contains malware could end up having their site red-flagged like this, and they might not know about it for weeks if they haven't installed the SiteAdvisor plugin. It's a real threat to ISVs.
Julian Moss
Tech-Pro.net
http://blog.tech-pro.net/entry/48/Now_Yahoo_is_libelling_us
Semi Transparent .PNG Buttons
On Iconico.com and BitsDuJour.com we use semi transparent 'glassy' buttons, and similar ones are found all over the web. The nice thing about our buttons is that they are really easy to make, and don't require any JavaScript to have a rollover state. You can change the color using a stylesheet, without need to cut separate images for a highlight button. They work in all modern browsers and degrade perfectly for older browsers, and as they are simply hyperlinks they are excellent for search engine optimization.
Here are a few Examples!
All the above examples are made with just one image, and as you can see you can use any text effect and color that you want
So fire up your copy of Adobe PhotoShop and follow along.
First up, make a new image for your button, ours is 120pixels by 46 pixels. You'll need to turn on the Guides, which can be found on the 'View' menu under 'Show' and then 'Guides'.
Create several guides, ours are 4 pixels in from the edge, and then two more guides 26 pixels in from each edge.
Then using the Elliptical Marquee tool select the left area and the right area. You'll need to hold down the 'Shift' key to make the second selection.
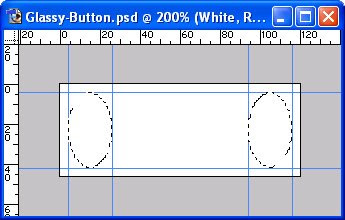
Now shift to the Rectangular Marquee tool and again hold down shift. Select the area between your two ovals so you have the following area selected.
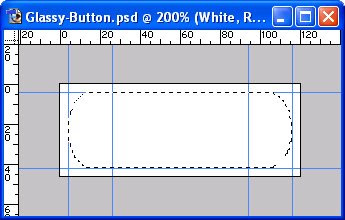
Press 'Delete' to clear the selected area, showing the background. Note we're at 200% magnification here, your actual button will be half the size.
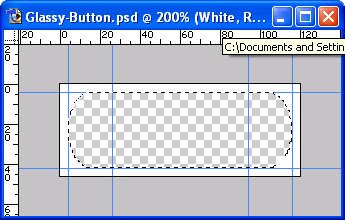
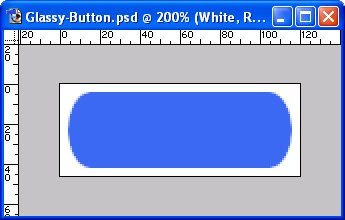
We'll now make another layer below our white layer and fill it in blue, just so we can see what we're doing. We won't actually use this layer in the final button.
Next up we make a layer between the blue and the white layer for the dark fade. Using the Gradient Fill tool we fill from Black to Transparent.
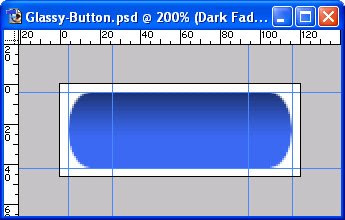
That done we'll select the white layer again and using the Magic Wand tool we'll select the hole. Then from the 'Select' menu we choose 'Modify' then 'Contract' and make the selection smaller by 2 pixels.
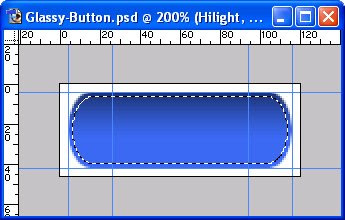
We'll now make our final layer for the hilight. Switching back to the Gradient Fill tool we'll make a fill on this layer from White to Transparent. Note you can chop the bottom off of the hilight using the Elliptical Marquee tool if you want a higher gloss button.
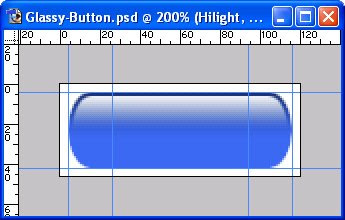
Now all that remains is to hide the blue layer as we don't need it in our final button, and then we'll save the image as a .PNG, which is the file we'll use on our webpage.
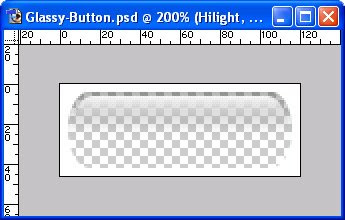
Your layers should look something like this.
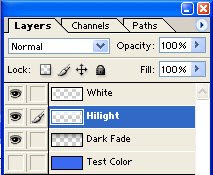
Ok, so close PhotoShop and switch to your favorite text editor to start in with the HTML. What we need to do is make a link and give it the class 'GlassyButton'. In our stylesheet we define the background-image as our .png graphic that we created above. As the .png is transparent the blue background-color shows through. The ':hover' state simply has a different background color, so without fuss we have a rollover state for our button. We've also specified a ':active' state which will be a darker blue, shown when the button is pressed and the mouse is moved away.
A couple technical notes on the css, we do need to use 'float:left;' in order for Firefox not to shrink the image to the size of the text, you can instead use 'display:block;' if that works for you.
You can specify any color or size of font that you like, and easily put in rollover text effects. The css line 'line-height:46px;' controls the position of the text vertically.
So what about Internet Explorer 6! Well IE6 doesn't support .png background images so they easiest solution is to plug in a copy of pngFix and with a couple lines of Javascript older browsers will show everything without a problem.
Download .PNG
Here are a few Examples!
All the above examples are made with just one image, and as you can see you can use any text effect and color that you want
So fire up your copy of Adobe PhotoShop and follow along.
First up, make a new image for your button, ours is 120pixels by 46 pixels. You'll need to turn on the Guides, which can be found on the 'View' menu under 'Show' and then 'Guides'.
Create several guides, ours are 4 pixels in from the edge, and then two more guides 26 pixels in from each edge.
Then using the Elliptical Marquee tool select the left area and the right area. You'll need to hold down the 'Shift' key to make the second selection.

Now shift to the Rectangular Marquee tool and again hold down shift. Select the area between your two ovals so you have the following area selected.

Press 'Delete' to clear the selected area, showing the background. Note we're at 200% magnification here, your actual button will be half the size.

We'll now make another layer below our white layer and fill it in blue, just so we can see what we're doing. We won't actually use this layer in the final button.

Next up we make a layer between the blue and the white layer for the dark fade. Using the Gradient Fill tool we fill from Black to Transparent.

That done we'll select the white layer again and using the Magic Wand tool we'll select the hole. Then from the 'Select' menu we choose 'Modify' then 'Contract' and make the selection smaller by 2 pixels.

We'll now make our final layer for the hilight. Switching back to the Gradient Fill tool we'll make a fill on this layer from White to Transparent. Note you can chop the bottom off of the hilight using the Elliptical Marquee tool if you want a higher gloss button.

Now all that remains is to hide the blue layer as we don't need it in our final button, and then we'll save the image as a .PNG, which is the file we'll use on our webpage.

Your layers should look something like this.

Ok, so close PhotoShop and switch to your favorite text editor to start in with the HTML. What we need to do is make a link and give it the class 'GlassyButton'. In our stylesheet we define the background-image as our .png graphic that we created above. As the .png is transparent the blue background-color shows through. The ':hover' state simply has a different background color, so without fuss we have a rollover state for our button. We've also specified a ':active' state which will be a darker blue, shown when the button is pressed and the mouse is moved away.
<html>
<head>
<title>Glassy Buttons</title>
<style>
a.GlassyButton, a.GlassyButton:link
{
width:120px;
height:46px;
float:left;
color:#fff;
font-size:15px;
font-weight:bold;
text-decoration:none;
font-family:Arial, Helvetica, sans-serif;
text-align:center;
line-height:46px;
background-image:url(Glassy-Button.png);
background-color:#4982F7;
}
a.GlassyButton:active {background-color:#3B68C6;}
a.GlassyButton:hover {background-color:#709EFF;}
</style>
</head>
<body>

<h4>Glassy Buttons</h4>

<a href="http://www.icoblog.com" class="GlassyButton">IcoBlog</a>

</body>
</html>
A couple technical notes on the css, we do need to use 'float:left;' in order for Firefox not to shrink the image to the size of the text, you can instead use 'display:block;' if that works for you.
You can specify any color or size of font that you like, and easily put in rollover text effects. The css line 'line-height:46px;' controls the position of the text vertically.
So what about Internet Explorer 6! Well IE6 doesn't support .png background images so they easiest solution is to plug in a copy of pngFix and with a couple lines of Javascript older browsers will show everything without a problem.
Download .PNG
Saturday, July 5, 2008
Converting Email Message Formats with Mailbox-SDK
If you've taken a look at our Mailbox-SDK you'll already know that we've simplified the task of doing all this communication, providing just one API so you can pick your email client and let us do the hard work. Well we've just released the latest version of the Mailbox-SDK which has a couple great new features which now come included.
Next is our new Mailbox Restore API. As you may know Outlook and the other email clients save emails as part of a single mailbox file. It's all very well being able to pull out files from a mailbox and save them to disk, which the Mailbox-SDK already does, but what if you want to restore those emails back into a mailbox? Well that's what the restore API is for; perfect for writing email archiving and backup applications.
Labels:
Iconico
Tuesday, July 1, 2008
Avangate Interviews Nico Westerdale
 We've worked with Avangate, one of the web's leading e-commerce providers for software, for some time now. I was really happy when they asked me to participate in their web interview series. You can read the interview on the Avangate Interview Site.
While we're at it we have two podcasts up about Bits du Jour on the Dot Net Preacher site and The Force Field.
Subscribe to:
Posts (Atom) 
