Sunday, July 6, 2008
Semi Transparent .PNG Buttons
On Iconico.com and BitsDuJour.com we use semi transparent 'glassy' buttons, and similar ones are found all over the web. The nice thing about our buttons is that they are really easy to make, and don't require any JavaScript to have a rollover state. You can change the color using a stylesheet, without need to cut separate images for a highlight button. They work in all modern browsers and degrade perfectly for older browsers, and as they are simply hyperlinks they are excellent for search engine optimization.
Here are a few Examples!
All the above examples are made with just one image, and as you can see you can use any text effect and color that you want
So fire up your copy of Adobe PhotoShop and follow along.
First up, make a new image for your button, ours is 120pixels by 46 pixels. You'll need to turn on the Guides, which can be found on the 'View' menu under 'Show' and then 'Guides'.
Create several guides, ours are 4 pixels in from the edge, and then two more guides 26 pixels in from each edge.
Then using the Elliptical Marquee tool select the left area and the right area. You'll need to hold down the 'Shift' key to make the second selection.
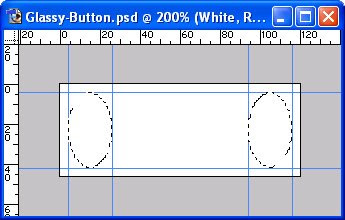
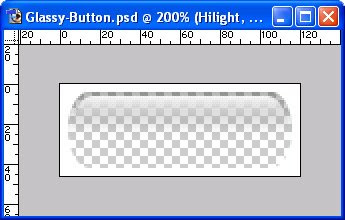
Now shift to the Rectangular Marquee tool and again hold down shift. Select the area between your two ovals so you have the following area selected.

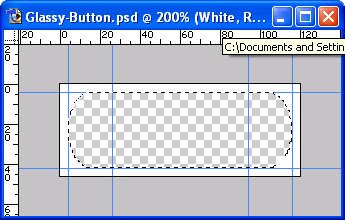
Press 'Delete' to clear the selected area, showing the background. Note we're at 200% magnification here, your actual button will be half the size.
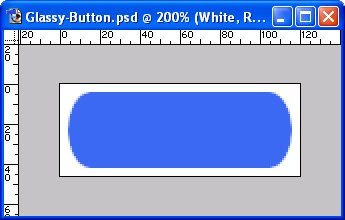
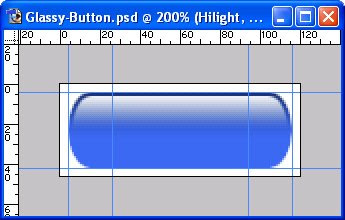
We'll now make another layer below our white layer and fill it in blue, just so we can see what we're doing. We won't actually use this layer in the final button.
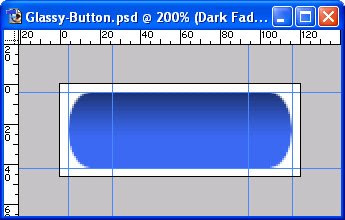
Next up we make a layer between the blue and the white layer for the dark fade. Using the Gradient Fill tool we fill from Black to Transparent.
That done we'll select the white layer again and using the Magic Wand tool we'll select the hole. Then from the 'Select' menu we choose 'Modify' then 'Contract' and make the selection smaller by 2 pixels.
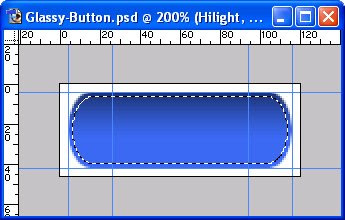
We'll now make our final layer for the hilight. Switching back to the Gradient Fill tool we'll make a fill on this layer from White to Transparent. Note you can chop the bottom off of the hilight using the Elliptical Marquee tool if you want a higher gloss button.
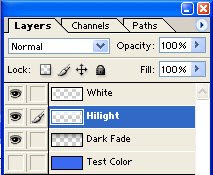
Now all that remains is to hide the blue layer as we don't need it in our final button, and then we'll save the image as a .PNG, which is the file we'll use on our webpage.
Your layers should look something like this.
Ok, so close PhotoShop and switch to your favorite text editor to start in with the HTML. What we need to do is make a link and give it the class 'GlassyButton'. In our stylesheet we define the background-image as our .png graphic that we created above. As the .png is transparent the blue background-color shows through. The ':hover' state simply has a different background color, so without fuss we have a rollover state for our button. We've also specified a ':active' state which will be a darker blue, shown when the button is pressed and the mouse is moved away.
A couple technical notes on the css, we do need to use 'float:left;' in order for Firefox not to shrink the image to the size of the text, you can instead use 'display:block;' if that works for you.
You can specify any color or size of font that you like, and easily put in rollover text effects. The css line 'line-height:46px;' controls the position of the text vertically.
So what about Internet Explorer 6! Well IE6 doesn't support .png background images so they easiest solution is to plug in a copy of pngFix and with a couple lines of Javascript older browsers will show everything without a problem.
Download .PNG
Here are a few Examples!
All the above examples are made with just one image, and as you can see you can use any text effect and color that you want
So fire up your copy of Adobe PhotoShop and follow along.
First up, make a new image for your button, ours is 120pixels by 46 pixels. You'll need to turn on the Guides, which can be found on the 'View' menu under 'Show' and then 'Guides'.
Create several guides, ours are 4 pixels in from the edge, and then two more guides 26 pixels in from each edge.
Then using the Elliptical Marquee tool select the left area and the right area. You'll need to hold down the 'Shift' key to make the second selection.
Now shift to the Rectangular Marquee tool and again hold down shift. Select the area between your two ovals so you have the following area selected.
Press 'Delete' to clear the selected area, showing the background. Note we're at 200% magnification here, your actual button will be half the size.
We'll now make another layer below our white layer and fill it in blue, just so we can see what we're doing. We won't actually use this layer in the final button.
Next up we make a layer between the blue and the white layer for the dark fade. Using the Gradient Fill tool we fill from Black to Transparent.
That done we'll select the white layer again and using the Magic Wand tool we'll select the hole. Then from the 'Select' menu we choose 'Modify' then 'Contract' and make the selection smaller by 2 pixels.
We'll now make our final layer for the hilight. Switching back to the Gradient Fill tool we'll make a fill on this layer from White to Transparent. Note you can chop the bottom off of the hilight using the Elliptical Marquee tool if you want a higher gloss button.
Now all that remains is to hide the blue layer as we don't need it in our final button, and then we'll save the image as a .PNG, which is the file we'll use on our webpage.
Your layers should look something like this.
Ok, so close PhotoShop and switch to your favorite text editor to start in with the HTML. What we need to do is make a link and give it the class 'GlassyButton'. In our stylesheet we define the background-image as our .png graphic that we created above. As the .png is transparent the blue background-color shows through. The ':hover' state simply has a different background color, so without fuss we have a rollover state for our button. We've also specified a ':active' state which will be a darker blue, shown when the button is pressed and the mouse is moved away.
<html>
<head>
<title>Glassy Buttons</title>
<style>
a.GlassyButton, a.GlassyButton:link
{
width:120px;
height:46px;
float:left;
color:#fff;
font-size:15px;
font-weight:bold;
text-decoration:none;
font-family:Arial, Helvetica, sans-serif;
text-align:center;
line-height:46px;
background-image:url(Glassy-Button.png);
background-color:#4982F7;
}
a.GlassyButton:active {background-color:#3B68C6;}
a.GlassyButton:hover {background-color:#709EFF;}
</style>
</head>
<body>

<h4>Glassy Buttons</h4>

<a href="http://www.icoblog.com" class="GlassyButton">IcoBlog</a>

</body>
</html>
A couple technical notes on the css, we do need to use 'float:left;' in order for Firefox not to shrink the image to the size of the text, you can instead use 'display:block;' if that works for you.
You can specify any color or size of font that you like, and easily put in rollover text effects. The css line 'line-height:46px;' controls the position of the text vertically.
So what about Internet Explorer 6! Well IE6 doesn't support .png background images so they easiest solution is to plug in a copy of pngFix and with a couple lines of Javascript older browsers will show everything without a problem.
Download .PNG
Subscribe to:
Post Comments (Atom) 

6 comments:
Thanks ;-)
Post a Comment